I have been working hard on my craft since 2004, and I think I have a skill level that shows in my work. I am the do over queen and there are many heads without bodies to suggest that these mistakes drive me to the perfect end. The finished doll always seems to lead to the next doll, one is born out of another. This is why I love making dolls. It is the air I breathe and pretty much defines me. I am a doll maker.

This may sound strange but these bodiless heads and headless bodies speak to me. I have control over the parts and pieces individually, but the position involved in the connection is revealed at the moment the pieces touch one another for the first time. The head moves me to sew it in a certain pose, same with the hands and arms. The whole doll forms itself to be expressive according to its idea of itself.

Wednesday, December 31, 2008

How Will They Dress?


Dressing the dolls is always such a turning point and usually where I make many wrong choices, and I only discover this after I make the mock up.

One doll was inspired by a picture a friend sent me of Morticia Adams. Remember her long black dress? The doll has to put forth a pulled together appearance and she still lives life and dresses up, but there is always a memory of some sort of love................With the long dress that falls to the floor I want to bring a feeling of being brought down by the emotion of the memory.

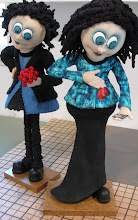
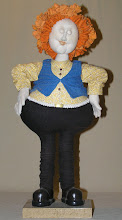
The other doll is a bit more angry in her torment so she gets to be dressed in mostly black. Must have some color, so blue is always good. The texture is both smooth and rough, dark and bright. This doll is figuring out that someone has played her for the fool............................but her love unfortunately rules.

Bald Armless Dolls need love...................

Tuesday, December 30, 2008

Sunday, December 21, 2008

Georgia and Star


These are the finished dolls. My friend will get the red head. Her name is Georgia. The doll with the purple hair is Star.

I love the long legs and the curvy hips these guys have. I think I am going to continue with this style until another style develops. I really love the faces, they are very inquisitive. They make me laugh and smile. Hope my friend will love Georgia.

The dolls are about 22" tall

Monday, December 15, 2008

A Sneak Peak


I couldn't help myself, I have to post something.................My friend never checks the blog out anyway.................I don't think..........................

I'm not really showing too much, but I thought they were so cute at this beginning stage, the point where they start telling me who they want to be. Can't wait to finish. Very close.

Wednesday, December 10, 2008

New and the Old

The heads I worked on have turned into actual dolls. I love them and they are still bald. I am taking photos, but because one is a Christmas present for an incredible friend I can not show them off yet.

I have posted photos along the side of some of the dolls I made from 2006 until recently. These dolls were well proportioned and I used some found birch tree limbs for the legs on most of these dolls. I did this as a solution to the fact that there was no way to make such dainty and fancy shoes and the legs presented a problem so my solution was organic and I think it works. Many of the elements in the skirts have an organic nature about them. I chose to keep the eyes closed because the dolls felt more inviting and serene. Click on the images to go to my etsy store.

These and all my dolls have taught me that successes come from one or more failures. The process has been very enlightening and I am living my dream.

Thursday, December 4, 2008

Goldie


I finished with Goldie and she is ready for someone out there to love............

I am very happy with how the dress looks with its crazy retro design. Not all girls can carry such a print off. Goldie's hair couldn't be better. (I got a tight spiral perm once. It was oh so painful. I think it might have been less painful to have it done like Goldie did.)

Making Goldie taught me that my necks need to be redesigned to make sewing them on the body a bit easier. Her head was a challenge to sew on.

I thank all who have followed her progress to the completion and appreciate your comments. I am doing some work now that just involves only heads. Just curious as to what I can come up with. I was inspired to make a Christmas gift for a friend so I might not put pictures up until she receives it.

Goldie is finished and on sale at artdollsbynat.etsy.com

Wednesday, November 26, 2008

Her Weave is In


This is Goldie's hairstyle. Lots and lots of sewing. If you look at the group of photos below, you will see some of what has to happen. Once all the pieces are sewn on the head, I put the steam iron to the hair and I pull the curl out and just start making a hair style. Then I do a little trimming and here is Goldie's head. The body has been waiting for her, so I guess I should introduce them...................

Monday, November 24, 2008

Hair and Shoes


Hair and Shoes are very important.


Goldie's hair is made of cotton twine that has been dyed in a brown and yellow dye bath. I mixed the two colors. I then dip the pieces into the fabric stiffener and wrap it around a 1/4 inch dowel and let dry. This is how I get the curl. Oh yeah always cover the dowel with vaseline so the twine will release. Now her head can't be sewn in to because it is too hard so I make a beret that gets glued on and suffed with polyfill. I can sew into this. I wrap some pieces around the edge to hide it and then I start sewing short pieces folded in half to the back and bottom of her head. I will work from the bottom and side to side and then come from the top down. This takes a few days, because I really never stick to one task for long.


The shoes for now are the same chunky and Doc Marten inspired. Why mess with a shoe that fits. These shoes are made of paper mache. They are messy to make but rather simple. I made a plaster mold about a year ago and I first cover it with vaseline so the shoe will release then I just press the strips of newspaper, with a glue/water coating, into the mold. I do 3 layers and dry in front of a fan to speed things up. I'll end up with 2 halves of 2 shoes. I have to connect the 2 halves with small strips and eventually I will end up with a whole shoe that gets sanded down, and then I cover with paper clay to get a more even layer, then sand again. I don't really try to get it perfect, it is what it is.

Friday, November 21, 2008

Thrift Store Find Leads to Inspiration


Last week I was shopping at a thrift store, which is truly the only place I love to shop, and I found this retro style fabric. It told me it wanted to be a dress for my next doll, and so it is. These A-line dresses need stockings and a bunchy undergarment that match. This fabric needed to be the golden color in the fabric. Had to figure if I could do it with the Rit dyes that I had. I made two different baths one was a straight golden yellow and the other had an orange and brown combo. So a long dyeing in the gold and a quick splash in the combo and I came close enough. I was impressed with my color mixing skill.

My first step in making a doll is usually making a head and then I will cover my dowels with a layer of batting and then some hosery and then I make the stockings and pull them over the legs. I sew a torso and stuff it pretty firm. I stick the legs into the bottom of torso. Now I will sew the legs on and then usually add some more batting to make a butt. The top of the hose can be pulled around this and sewn, this helps to flatten out bumps.

The bunchy undergarment is about 1 yard x 6" of fabric. It is gathered below the waist and sewn on and gathered around the legs and sewn. It will hang down for the moment.

I have made a pattern for the A-line dress. I line the dress with muslin. I make 2 fronts and 2 backs and stitch and turn each. I construct the dress and put it on the torso and then brush the stiffener on. Once this hardens, the undergarment gets the stiffener and worked into place. The doll will dry upside down.

I have decided to make some puffy sleeves and now I am working on dying some material for the hair. Hair is always trial and error. So I can't share much more right now.........

Later.......................Nat

Wednesday, November 19, 2008

The Hat


So she is finished. She presented me with a few problems: the hair was in the way of the shirt collar and the jacket collar. I have been bad about not looking ahead at assembly and heads had to come off............but I was good and remembered my past mistakes and I made a list of my steps so it worked. It was still difficult sewing in tight places, but she is finished.

I decided to title her "The Hat" since it was the hat that inspired me to make her.

I have started on a new doll and I am on a quest to find a small curved needle. I need this badly along with tiny hands............

You can find this doll as well as others at my etsy shop. artdollsbynat.etsy.com
http://www.etsy.com/shop.php?user_id=5271522

Sunday, November 16, 2008

Sunday, November 16, 2008


I am working on the base to this doll so I am almost finished. In the photo above you notice I have a bottle of fabric stiffener. This product is the best. It is thick and it stiffens better than other products. I use it on the head, hands and outfit. I applied it on the jacket while I was pulling it to the desired shape. It can take a few hours to dry but putting it in front of a fan will speed the process along. I have found that it can dry uneven and sometimes shining, not sure how to control this. I am hoping to be through with this doll and starting a new one on Monday.

Friday, November 14, 2008

Friday, November 14th, 2008

My newest collector just received her doll, and I am so happy that my creation is in her loving care. Please take a look at this blog.
http://itsybitsyfunzyonesie.blogspot.com/

I have almost finished the latest doll and already have a new head for another one. I found some crazy retro fabric at the thrift store yesterday that I think I will make her dress from. I have an idea for the hair but it is always about the execution. Sometimes the hair can't be controlled or forced. Just like mine.

Sunday, November 9, 2008

Sunday, November 9th, 2008

I wonder if bleeding while making dolls is a bad thing or acceptable as part of the process. Of course I have stuck plenty of needles into my fingers. Not so bad, but this does interrupt my work until the bleeding ceases or I find a bandage. What hurts more than forcing a needle into a finger is doing the opposite. I was putting something down and the back side of my wrist stuck into a T-pin. The T-pin probably went in 1/8" before I pulled back. The T-pin along with the doll arm it was stuck in was sticking out of my wrist. It doesn't do any good to look and think about this, the best thing is to react and pull the arm out and then use all the words available. OUCH!!!!!!!!!!!!!!!!!!!!!!!!!!!!!!!!!!!!!!